


The Real World…
 When I was working on my new vest, I wrote that I don’t always put the fabric away, but just push it aside for now. My justification for this practice is that I might need a piece of that fabric and I don’t want to stop the creative process by organizing my fabric neatly on the shelves.
Well, that was a couple of weeks ago and the fabrics are still all nestled together on the floor of my sewing room. I’m going to go fold and put them all away just as soon as I finish writing this post.
But just in case you think my sewing area is always as neat as it was portrayed in my DVD, I thought I would show you my real world!
I’ll begin packing tomorrow for a trip to Hershey, PA this week to teach several days of classes at the Quilt Odyssey. This is a return trip for me so I know what to expect….Chocolate and lots of it!
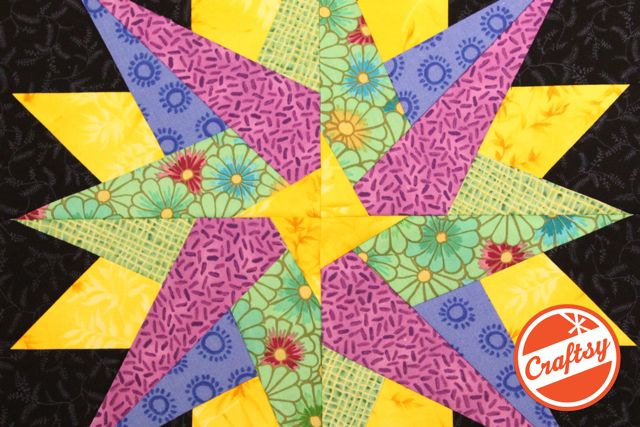
It is also time to share with you the third clue in the “Collect the Clue” game. Just in case you are wondering, there will be a total of five clues. So, only two more clues to go before someone is going to win 60 Fat Quarters!!! Once I announce the fifth and final clue, just email me and let me know what the image is and you may be the winner.
Clue # 3- The monthly news is no longer just black and white, but filled with lots of color and inspiring quilts.
May all your points be perfect,
Carol
July 21st, 2008 at 6:49 am
Carol, That looks like my “sewing room” used to look, which is really just part of a room now, but I used to do the same thing with my fabrics and whatever else I needed for that project(s) because I always needed to find another ‘little’ piece of some fabric or something else I have used in my current project(s) (of which I might have 4 or 5 going at the same time – no wonder I have so many UFO’s!). And because I moved and only have a “sewing space” in part of a room now, I kept getting everything mixed up between projects and wasted more time trying to find what I was look for than PPing. So I bought some medium-sized, clear storage bins at a close-out store – very inexpensively – and now after cutting all the pieces I need for each block for the project I stick post-it notes with their block name and location, etc. stuck on the top of each pile (plus some extra fabric from each color-just in case), color pics of the completed blocks (in my colors) and a color pic (in my colors) of whatever I’m making, and at least 1 or 2 extra blank printed block(s) used in this project (on your paper of course!) just in case I ruin one – it saves me the trouble of having to print out another copy. I put all the color prints, extra block copies, and the cut fabrics with their correct post-it notes and the block it goes into marked with the same info that is marked on the post-it note)into either it’s own page protector (copies of blocks) or a ziploc bag (cut fabrics with post-it notes and the cut pattern piece it goes to) so that nothing gets mixed up; I put the page protectors at the bottom of the bin underneath everything else so they don’t get wrinkled or ruined. If I do ruin part of a block I’m sewing, if it’s a small block, usually I’ll just start over with a new one, but if it’s a large block, like a one-piece block, I’ll use my tape the way Carol showed us) and reverse-stitch that part and then sew the correct piece on. Then I save the “mistake” piece in a bin I have labeled ‘FOR MINI QUILTS’ — this is where I get almost all of the fabric I make my mini quilts with! I never throw any piece of fabric away!! I can always find someplace in a mini to use it. I put the cover for each bin underneath it (or in my storage room) because there’s usually so much stuff in the bin that it won’t fit on top and close anyways, plus I don’t want to trap any moisture inside there and ruin anything! I also tape (just around the edges) a lined post-it type index card on the FRONT of the bin and list with a fine-tip black Sharpie pen: Project/Pattern Name, Book/ Magazine/website/etc. (where the project/pattern came from, fabrics used, threads I’m using (brand, size, color number, etc.: all the info on the end of the spool), tools needed for this project, special needles and thread for quilting (if needed), along with any quilting patterns (also stored in page protectors (if I have them already or might want to use them) and anything else I need for this project — just in case I’m using something on more than one project (and if I am, I put a red asterisk next to that so that I know I need to use it someplace else too! And then I bought a separate larger size, 3-drawer roll-away bin for all my tools so those don’t get lost in one of the project bins! I also bought another one for my thread and bought smaller divider/ containers for each type of thread to try and contain all my threads without having a tangled mess in there! They both fit right next to my sewing machine table — one on each side. I also installed a large white shelf on the wall above my sewing machine (just high enough so I can reach it without having to stand on my ‘rolly’ chair that I sit on for sewing (or any other chair – and maybe falling off!) and keep the bins there — it fits 5 bins comfortably without them falling off on my head! That way I can read what’s on the index card and I know where everything is (at least most of the time I do!). I guess I’m a lot more organized than I thought and than I used to be when I had a whole room for sewing as opposed to a “sewing space” in part of a room now!
Also, if I haven’t said so before, I love your new blog and everyone from your group should join! All I did to join was to click on the picture like it said and it brought me to the correct place to sign up. I’ll read through all the messages and see if anyone posted this yet, and if not I’ll add how to do it!
Thanks for all you do for us – which is a tremendous amount!!!!
Donna Palumbo in NH
July 21st, 2008 at 4:32 pm
I loved Donna’s explanation of how she organized her sewing room. I lean towards her need for organization. I must put everything away and “clear the deck” each time I quit sewing for the day. My main storage system is pegboard walls with pegs to hang tools and rulers on. A file cabinet for papers and patterns and
storage cabinets with doors so everything is hidden away when not in use.
Phyllis – Ohio USA
July 21st, 2008 at 4:34 pm
I loved Donna’s explanation of how she organized her sewing room. I lean towards her need for organization. I must put everything away and “clear the deck” each time I quit sewing for the day. My main storage system is pegboard walls with pegs to hang tools and rulers on. A file cabinet for papers and patterns and
storage cabinets with doors so everything is hidden away when not in use.
Phyllis – Ohio USA